I've been sitting on this really excellent step by step fly tutorial from Matt Bennett of Fly Geek and since I'm sitting in an airport waiting a flight to Michigan (think steelhead) it gave me a few minutes to piece this post together. Read, see, and tie some up.
Matt wrote... "The
Lunch Money was created out of need for a bite-sized baitfish streamer
for the Texas Hill Country. Most of our baitfish are in the 2-3" range
and due to our normally ultra-clear water, our bass can be fairly
finicky, which meant it needed to both look realistic and have the right
amount of movement to The original iteration was named the "Llano
Critter" after the Llano River west of here, where it produced very
well.
The original variation was based off of Charlie Craven’s Gonga
streamer and tied hook-down with larger legs, a spun craft fur head, and
just a tail (no wrapping for a profile transistion) on a TMC 8089.
After coming across Laser Dub a few years back thanks to Mike Schmidt’s
patterns, I incorporated that to give it a nice, translucent profile in
the water with just the right amount of sheen. I also flipped the fly
to ride hook up at that time, as I'd often get fish following the fly
and wanted to be able to retrieve slower without hanging up on the
bottom.
Originally I trimmed the head to shape but after brushing the
Laser Dub back instead, I ended up with a similar shape with more
water-pushing bulk. After the TMC 8089 was discontinued in the smaller
sizes, I moved to a Gamakatsu B10S, which has allowed me to tie it in a
few more sizes.
I continue to refine it a bit
as new materials are released, like Hareline’s new Double Pupil Eyes,
and Senyo’s Fusion Dub and Fusion Legs. Many of the available colors
listed on my website incorporate special colors of Fusion and Laser dub
that I blend myself. Umqua Feather Merchants picked up the rights to
this fly early last year, and certain colors will be available through
them at the beginning of 2016. The full lineup is available through my
website, Fly Geek."
BENNETT'S LUNCH MONEY
HOOK: Gamakatsu B10S, Size 2
EYES: Hareline Double Pupil Lead Eyes, Black/Yellow w/ Black Pupil
THREAD: Danville Flat Waxed Nylon, White
TAIL: Hareline Black Barred Zonker Strip, Gold Variant
LEGS: Hareline Grizzly Flutter Legs, Black Barred Root Beer
BODY: Senyo’s Laser Dub, Brown, Yellow, Sculpin Olive
MARKER: Prismacolor/Copic Red, Black, Back, Yellow
GLUE: Loon UV Flow
Step
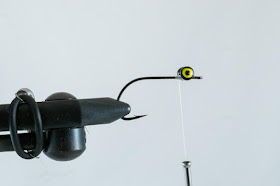
1: Attach your thread to the hook and create a bump of thread about 2
hook-eye lengths back from the eye of the hook. Figure-eight on your
eyes. I used the medium size for a #2, small for a #4, and x-small for a
#6.
Step 2: Wrap back on the hook shank until
you’re above somewhere between the barb and hook point. Measure out
your rabbit strip tail – I typically do 1.25 – 1.5 shank lengths.
Invert your vise and poke the hook point through the skin-side of the
zonker strip at the point you measured out.
Step
3: Remove the hook from the vise. Slide the zonker up the hook shank
to where your thread base ends, then flip it 180 degrees back towards
the hook bend. Tie in your tail and move your thread in front of the
remaining piece of zonker facing towards the hook eye.
Step
4: Wrap your thread to the midpoint between where the tail and lead
eyes are tied in. Grab the remaining zonker piece and wrap a collar
with 2-3 wraps, depending on the thickness and length of the zonker. I
did 2 here. Tie down and cut the remainder of the zonker strip off.
Step 5: Tie in two Grizzly Flutter Legs at their midpoint on the side of the hook directly in front of your collar.
Step
6: Pull the two front-facing legs over the top of the fly, stretching
them to opposite side of the hook. Wrap backwards with your thread,
binding them down securely. Do not stretch them too much as they can
break fairly easily.
Step 7: Take two clumps of Yellow Laser Dub. Find the midpoints of each and tie them on the top and bottom of the hook shank.
Step
8: Use your non-bobbin hand to hold these clumps back towards the tail
and build a small thread dam in front to keep them laid back.
Step 9: Repeat steps 7 & 8 with a clump of Brown on top, and Yellow on bottom. Remember that the fly rides hook-up.
Step
10: Move your thread in front of the eyes. Repeat steps 7 & 8
with Sculpin Olive on top, and Yellow on bottom. Whip finish.
Step
11: Brunch the fly very well with a dubbing brush. I am partial to
Hareline’s Ultimate Dubbing Brush for this. I’ll brush it forward over
the hook eye and then back towards the tail.
Step
12: Finish the fly. I add marker spots and color the thread to match
the top and bottom of the fly before coating with Loon Flow and curing.
Don't want to tie your own? Jump on the Tacky Big Bug + Lunch Money Assortment.
Want to see more? Check out the Fly Geek website.
Thanks Matt for taking the time to putt his together. Look for a
giveaway on the T.F.M. social media pages later today with a mix of
flies from Fly Geek and the Blackland Woodworks fly box that was shown
being built on T.F.M. a few posts ago.


No comments:
Post a Comment