
Proving that building your first fly rod can and will lead to wanting to build many more fly rods, Jason Beard of Tasmania, Australia recently posted a few images on his Instagram page of his Swift Fly Fishing Epic 476 Ready To Wrap Fly Rod Kit build which came out stunningly.
Jason is a good sport and was kind enough to share a few images along with some narrative of how this fly rod build came together for this T.F.M. post. I don't think he could have gotten that color match any better with the fly reel and thread wraps.


Follow along with Jason's future fly rod builds on the Limnology Fly Rods Instagram page.
Want to build your own fly rod? Check out the Ready To Wrap Fly Rod Kits from Swift Fly Fishing.
Jason is a good sport and was kind enough to share a few images along with some narrative of how this fly rod build came together for this T.F.M. post. I don't think he could have gotten that color match any better with the fly reel and thread wraps.

Jason wrote... "My first fly rod build was an Epic 764 three piece kit that I purchased a couple of years ago, just before
they decommissioned that model and started making them in four and five piece
configurations. The kit sat in storage for about a year before I started
building my rod. During this time I started planning out the color
scheme. I wanted a rod and reel combination that matched or at least,
complemented one another. Oddly, the development of the chosen color
scheme on the fly rod started with my old black Bauer M2 fly reel with a
silver spool. It was really beat up with rock rash but it's such a cool
retro looking reel that I thought would go really well with a
fibreglass blank. Even though the reel was still functionally perfect, I
decided to have the reel re-anodized to a blue color as it wasn't as
pretty as it used to be and it hid the rock rash. I had the reel foot
anodized to a natural silver color to match the spool. I then trialed a
few different color backing options but it really was a no brainer,
orange backing on a blue reel with a silver spool was the perfect
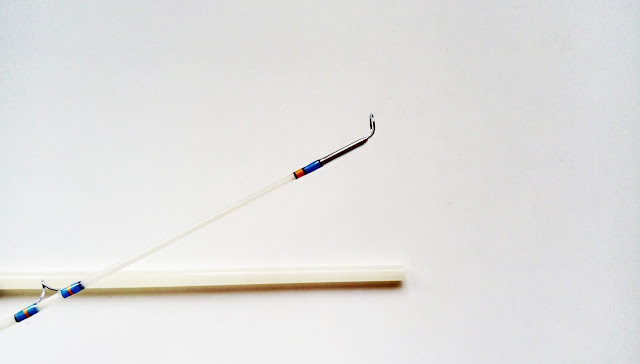
combination. I used the blue and black YLI thread that I ordered with
the kit and purchased orange YLI silk and an orange agate stripping
guide. These were the only additions I made to the kit. I then sat
down with some colored pencils and a sketch book and came up with the
color combination of blue, orange and black that I thought would work.
In the end I stuck with the snake guide color combination but changed
the number of thread wraps for the color scheme on the stripping guide,
ferrule wraps, winding check and hook keeper as my original plan didn't
look as good in real life as it did on paper.
I
practiced wrapping my threads and applying epoxy on a piece of dowel
first before wrapping the guides on my rod. I used a fair amount of
thread during the process but it was worth it, as I my thread work came
out fairly neat. For rod building references I used the Epic manual
extensively and a number of different you tube videos. I practiced all
the techniques but in the end, through trial and error I found what
works best for me.
I had many challenges along
the way, if a mistake could be made, I made it. Some of them are
hilarious and just plain embarrassing! The two biggest challenges I had
was color preserving the silk thread and applying the epoxy. For those
about to embark on their first rod build, color preserving silk threads
(if you are using silk) is challenging. You need way more color
preserver than what is recommended on the bottle, triple the amount in
fact! My first attempt at applying epoxy was a disaster. The room
temperature was too low and the epoxy didn't cure. I had to strip off
the epoxy and threads, clean the blank and start over again. I learned
from my mistake and got it right the second time around, well almost,
near enough! Applying epoxy is still difficult but I know it become
second nature with practice. I found that applying several thin coats
(with a little sanding between coats if needed) gave me the best
results. I ended up with what you see here in the pictures. I guess the
moral to the story is with a bit of patience, perseverance and a
willingness to learn from your mistakes you can build a rod that looks
okay. I'm already looking forward to my next rod build."


Follow along with Jason's future fly rod builds on the Limnology Fly Rods Instagram page.
Want to build your own fly rod? Check out the Ready To Wrap Fly Rod Kits from Swift Fly Fishing.
No comments:
Post a Comment