
This Year of the Bluegill fly tying tutorial has been sitting in the inbox for some time since it took me a few minutes to make sure that all the instructions matched the photos but glad to be posting Tyler Ringo's Pinup Gill pattern this morning. I dig this pattern since it can be fished at or near the surface or add a BB or two and drown it to find bluegills deep.
If you are tying up a dozen of these then be careful how many times you repeat STEP 1. They might start looking kind of messy after the first half doze or so.
MATERIALS LIST:
HOOK - Daiichi 1270 3XL
THREAD - Uni Thread 6/0 in color of choice
BODY - Any Synthetic or Natural Dubbing
RIBBING - Stretch Magic .5mm or Rubber Leg Material
SHELLBACK - Closed Cell Foam
HEAD - Any Synthetic or Natural Dubbing
This pattern rides on the surface and just under the surface film so can be fished still or stripped. The pattern is very versatile to any color that works in your region.
STEP 1 - Choose your favorite adult beverage open and sip.

Step 2 - Put a thread base down the shank to two or three wraps passed the barb of the hook and dub a small dubbing ball so that the finished wrap ends at the barb. Then wrap back up shank to just under half the hook length.

STEP 3 - Tie in bug legs back to dubbing ball and leave a little long (if you want to segment later it keeps the fingers from getting all marked up) and fold back and trim to equal length.

STEP 4 - Fold back bug legs on opposite side and tie down.

STEP 5 - Tie in the stretch magic or rubber leg material back to the tail legs for later ribbing.

STEP 6 - Dub the body tapering to the half way point on the shank. Repeat STEP 1.

STEP 7 - You can use these great foam cutters by river road creations or cut a wedge foam strip.

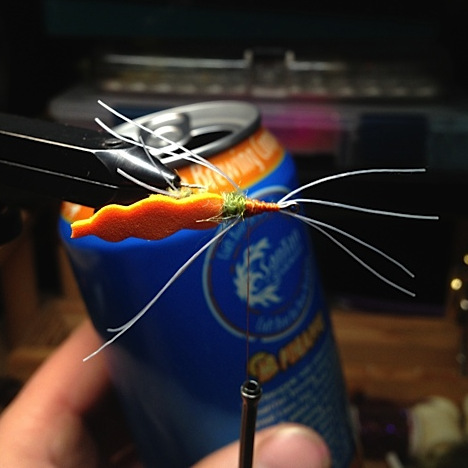
STEP 8 - Tie in the beaver tail foam tail first a 1/4 of the way back from the hook eye.

STEP 9 - Dub up to the 1/4 distance and rib the magic stretch or rubber leg material up to this point and tie off.

STEP 10 - Tie in the first side of bug legs from the end of the dubbing to just in front of the hook eye. Enough room to make wraps to secure the foam.

STEP 11 - Repeat on other side. Repeat STEP 1.


STEP 12 - Dub the head of the fly in-between the legs and make one or two wraps in front of the bug legs.

STEP 13 - Pinch the legs back with your dominate hand.

STEP 14 - Push the foam back forward with the other hand.

STEP 15 - Then pinch down with the non tying hand to hold the legs and the foam in place.

STEP 16 - Make a couple of wraps to secure the foam. I like to do a couple of half hitches here just to make sure the thread won’t slip off while you. Repeat STEP 1.

STEP 17 - Dub on a thin amount with a small gap before the fly.

STEP 18 - Fold the foam back and wrap the dubbing to secure the foam back. Half hitch or whip finish over the foam and clip off thread.

STEP 19 - If you want to segment the legs stretch the legs out and mark both top and bottom with a sharpie. Trim to desired length.

STEP 20 - Use a sharpie and color any way you want, there are no lines.

Feel free to repeat STEP 1 as many times as necessary to allow for creative freedom.
Hope you enjoyed...now go catch some bluegills.
If you are tying up a dozen of these then be careful how many times you repeat STEP 1. They might start looking kind of messy after the first half doze or so.
MATERIALS LIST:
HOOK - Daiichi 1270 3XL
THREAD - Uni Thread 6/0 in color of choice
BODY - Any Synthetic or Natural Dubbing
RIBBING - Stretch Magic .5mm or Rubber Leg Material
SHELLBACK - Closed Cell Foam
HEAD - Any Synthetic or Natural Dubbing
This pattern rides on the surface and just under the surface film so can be fished still or stripped. The pattern is very versatile to any color that works in your region.
STEP 1 - Choose your favorite adult beverage open and sip.

Step 2 - Put a thread base down the shank to two or three wraps passed the barb of the hook and dub a small dubbing ball so that the finished wrap ends at the barb. Then wrap back up shank to just under half the hook length.

STEP 3 - Tie in bug legs back to dubbing ball and leave a little long (if you want to segment later it keeps the fingers from getting all marked up) and fold back and trim to equal length.

STEP 4 - Fold back bug legs on opposite side and tie down.

STEP 5 - Tie in the stretch magic or rubber leg material back to the tail legs for later ribbing.

STEP 6 - Dub the body tapering to the half way point on the shank. Repeat STEP 1.

STEP 7 - You can use these great foam cutters by river road creations or cut a wedge foam strip.

STEP 8 - Tie in the beaver tail foam tail first a 1/4 of the way back from the hook eye.

STEP 9 - Dub up to the 1/4 distance and rib the magic stretch or rubber leg material up to this point and tie off.

STEP 10 - Tie in the first side of bug legs from the end of the dubbing to just in front of the hook eye. Enough room to make wraps to secure the foam.
STEP 11 - Repeat on other side. Repeat STEP 1.


STEP 12 - Dub the head of the fly in-between the legs and make one or two wraps in front of the bug legs.

STEP 13 - Pinch the legs back with your dominate hand.

STEP 14 - Push the foam back forward with the other hand.

STEP 15 - Then pinch down with the non tying hand to hold the legs and the foam in place.

STEP 16 - Make a couple of wraps to secure the foam. I like to do a couple of half hitches here just to make sure the thread won’t slip off while you. Repeat STEP 1.

STEP 17 - Dub on a thin amount with a small gap before the fly.

STEP 18 - Fold the foam back and wrap the dubbing to secure the foam back. Half hitch or whip finish over the foam and clip off thread.

STEP 19 - If you want to segment the legs stretch the legs out and mark both top and bottom with a sharpie. Trim to desired length.

STEP 20 - Use a sharpie and color any way you want, there are no lines.

Feel free to repeat STEP 1 as many times as necessary to allow for creative freedom.
Hope you enjoyed...now go catch some bluegills.
No comments:
Post a Comment