
I have been admiring the workmanship of Nick Taylor of Net Rod Trout for some time now. Not only is he an excellent fly rod builder (who's built some stunning fiberglass fly rods) but also builds very unique custom landing nets as well.
A few months ago Nick emailed asking if I had any favorite flies and that he had a project in mind. I riffled through an old fly box which held a few sentimental favorites and picked out a yellow Royal Wulff that I had caught a twenty inch Bonneville Cutthroat years ago in Wyoming. This fly was connected to a special memory and looked forward to see what Nick would do with it.

A couple weeks ago a packaged arrived from Australia with a stunning custom landing net inside (and a smaller wooden play net for the children). The Royal Wulff suspended in the resin looks so incredibly cool that I am thinking that this net may need to hang on the wall instead of being beat up on the stream.
I asked Nick if he'd put together a step by step tutorial to show how he puts his nets together and the narrative and photographs below do a good job of chronicling the intensive work that goes into each custom landing net.

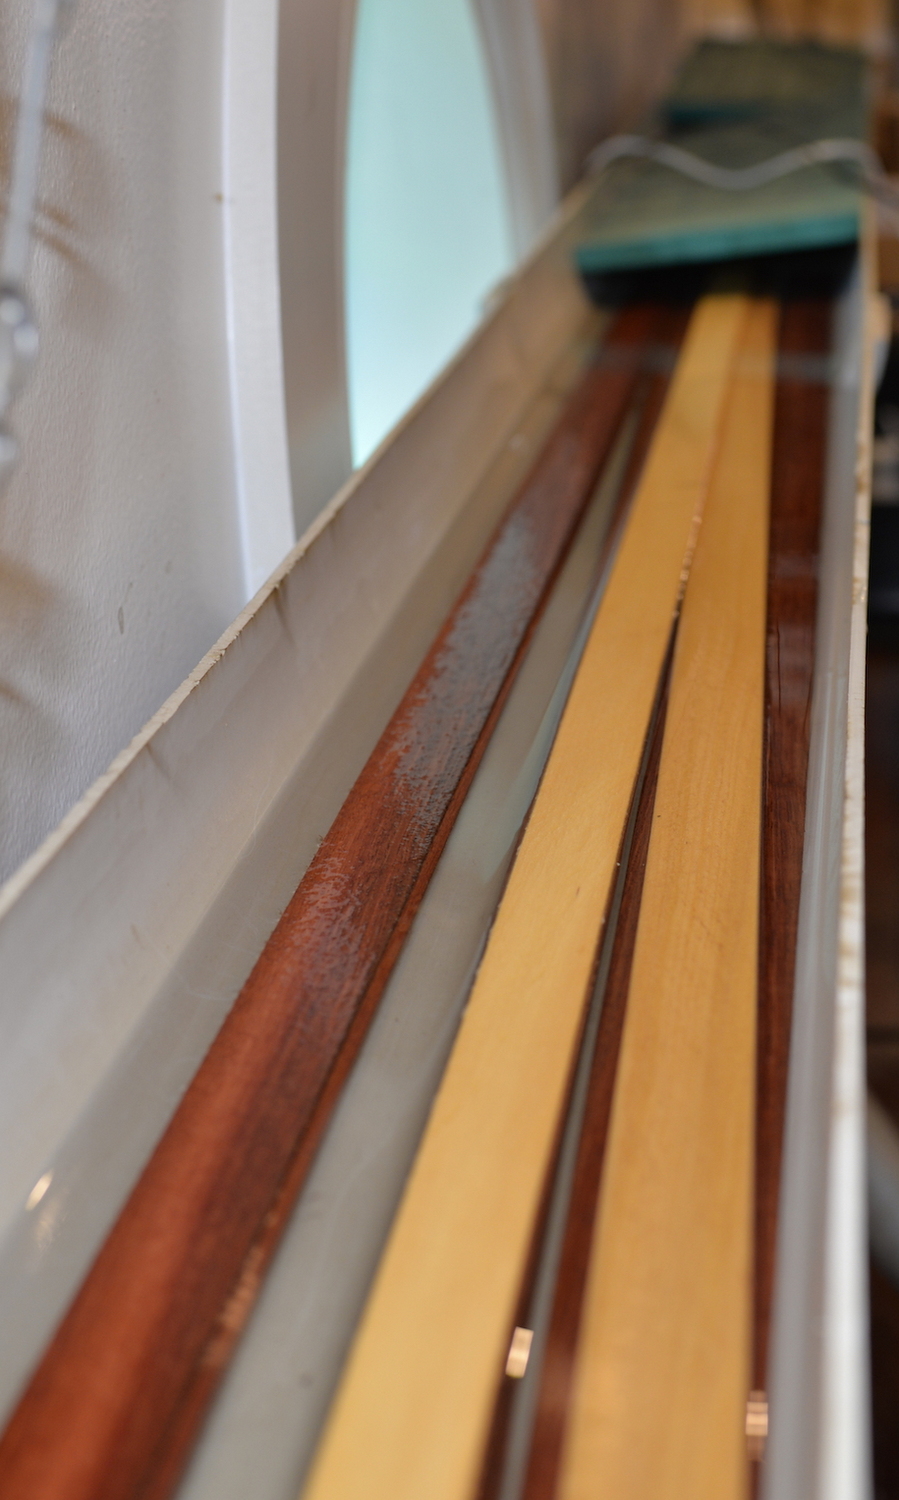
Nick wrote... "After ripping timber strips down to about 3mm on the table saw, the strips are finished on the drum sander to about 2.2mm. The net frame for this net is an outer and inner layer of Tasmanian Myrtle and an inner layer of Huon Pine, also form Tasmania."


"The net handle is cut on the band saw and then sanded to its final shape on the oscillating spindle sander. This net handle is a combination of American Walnut and North American Rock Maple."

"A hole is cut in the throat of the handle to take the resin set fly. The fly for this net is set in resin, cut out, hand shaped and polished before being set into the handle."

"After sanding, the net frame strips are soaked in a warm water bath (45C) for about 20 minutes. (I used to steam the strips but this takes much longer and can be dangerous dealing with 215 degree Celsius steam). The soaking is done to pre-form the shape of the net and makes gluing easier."


"Once the strips have soaked, they are clamped around the net frame mould and net handle. (Bicycle inner tube rubber, cut lengthways into long bands is a simple and efficient way to clamp the timber, negating the need to fiddle with dozens of mechanical clamps). The rubber strips enable even clamping pressure. Once clamped, the assembly is left to dry for a couple of days."


"Gluing the net frame to the handle is done in two stages. The first stage is gluing the inner layer of the net frame to the handle to ensure a good bond with no gaps. (Gluing all three layers can be tricky and result in imperfect bonds between the laminations). The second stage is gluing the two outer layers of the net frame. My net moulds are shaped from 25mm High Density Polyethylene (HDPE), most glues will not stick to HDPE."

"After the glue has set, in this case 48 hours, the rubber strips are removed and the net is left for a further 24 hours to cure. Once cured, the net is run through the drum sander to remove excess glue and bring the net down to its finished width."

"The inside and outside faces of the net are passed over the spindle sander, and then hand sanded."

"The edges of the net can be hand sanded to create a round edge or on the router table with a round-over bit, 3 or 4 mm. The slot on the outer face of the frame is also done on the router table using a single slot cutter blade and simple homemade jig to set the cut depth.
The net frame is measured along the length of the slot and divided up and marked for the holes that will allow the net bag to be strung to the frame. Depending on the size of the net frame, the holes might be 20 to 25mm apart."


"The fly is set in resin and cut out to the required diameter. This whole process is moderately complex and probably deserves an entire blog dedicated to the process. During curing, air bubbles have to be teased out of the resin while setting and the finishing process involves 1-2 hours of hand sanding and polishing."


"Net bags are made from a variety of Ace Knotless netting in either 1/8th or 1/4 inch square. The material comes in white, so I dye it black (comes in other colours on request). The net bag is cut using a template and hot knife, then the edges over-locked using a polyester UV resistant thread."


"The resin set fly is glued into the net, my brand is applied and the timber gets 3-4 coats of finish. The finish to the timber on this net is a marine grade oil blend that has a low sheen, bringing out the best of the timber grain."

Like I stated above, I am beyond impressed with Nick Taylor's work and appreciate him taking the time to create this very special landing net.
Interested in Nick creating something special for you too? Visit the Net Rod Trout website for more information.
A few months ago Nick emailed asking if I had any favorite flies and that he had a project in mind. I riffled through an old fly box which held a few sentimental favorites and picked out a yellow Royal Wulff that I had caught a twenty inch Bonneville Cutthroat years ago in Wyoming. This fly was connected to a special memory and looked forward to see what Nick would do with it.

A couple weeks ago a packaged arrived from Australia with a stunning custom landing net inside (and a smaller wooden play net for the children). The Royal Wulff suspended in the resin looks so incredibly cool that I am thinking that this net may need to hang on the wall instead of being beat up on the stream.
I asked Nick if he'd put together a step by step tutorial to show how he puts his nets together and the narrative and photographs below do a good job of chronicling the intensive work that goes into each custom landing net.

Nick wrote... "After ripping timber strips down to about 3mm on the table saw, the strips are finished on the drum sander to about 2.2mm. The net frame for this net is an outer and inner layer of Tasmanian Myrtle and an inner layer of Huon Pine, also form Tasmania."


"The net handle is cut on the band saw and then sanded to its final shape on the oscillating spindle sander. This net handle is a combination of American Walnut and North American Rock Maple."
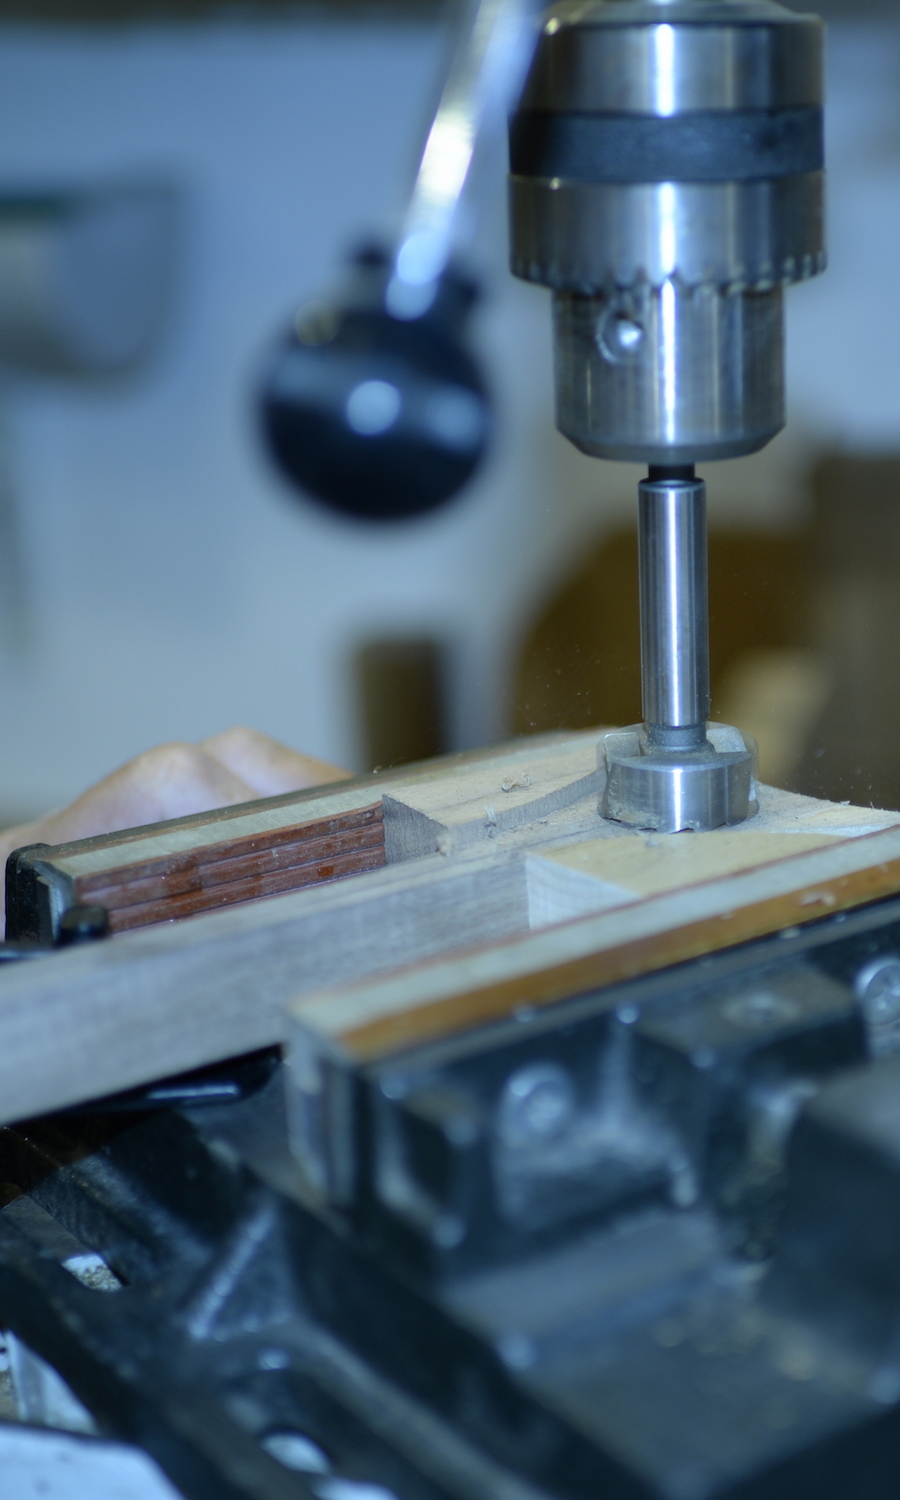
"A hole is cut in the throat of the handle to take the resin set fly. The fly for this net is set in resin, cut out, hand shaped and polished before being set into the handle."
"After sanding, the net frame strips are soaked in a warm water bath (45C) for about 20 minutes. (I used to steam the strips but this takes much longer and can be dangerous dealing with 215 degree Celsius steam). The soaking is done to pre-form the shape of the net and makes gluing easier."


"Once the strips have soaked, they are clamped around the net frame mould and net handle. (Bicycle inner tube rubber, cut lengthways into long bands is a simple and efficient way to clamp the timber, negating the need to fiddle with dozens of mechanical clamps). The rubber strips enable even clamping pressure. Once clamped, the assembly is left to dry for a couple of days."


"Gluing the net frame to the handle is done in two stages. The first stage is gluing the inner layer of the net frame to the handle to ensure a good bond with no gaps. (Gluing all three layers can be tricky and result in imperfect bonds between the laminations). The second stage is gluing the two outer layers of the net frame. My net moulds are shaped from 25mm High Density Polyethylene (HDPE), most glues will not stick to HDPE."

"After the glue has set, in this case 48 hours, the rubber strips are removed and the net is left for a further 24 hours to cure. Once cured, the net is run through the drum sander to remove excess glue and bring the net down to its finished width."
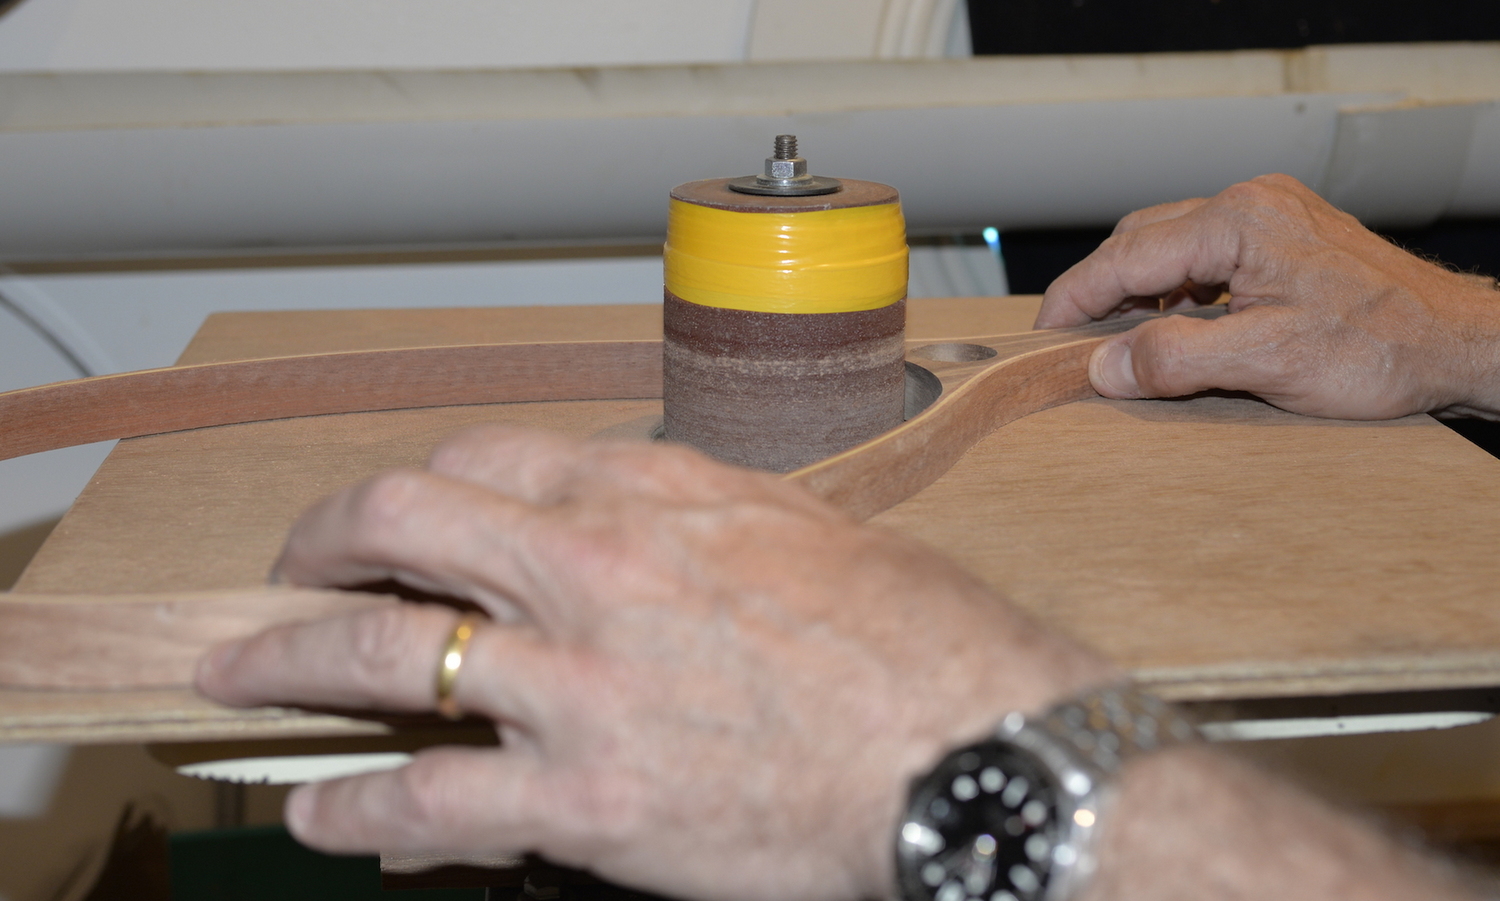
"The inside and outside faces of the net are passed over the spindle sander, and then hand sanded."

"The edges of the net can be hand sanded to create a round edge or on the router table with a round-over bit, 3 or 4 mm. The slot on the outer face of the frame is also done on the router table using a single slot cutter blade and simple homemade jig to set the cut depth.
The net frame is measured along the length of the slot and divided up and marked for the holes that will allow the net bag to be strung to the frame. Depending on the size of the net frame, the holes might be 20 to 25mm apart."


"The fly is set in resin and cut out to the required diameter. This whole process is moderately complex and probably deserves an entire blog dedicated to the process. During curing, air bubbles have to be teased out of the resin while setting and the finishing process involves 1-2 hours of hand sanding and polishing."


"Net bags are made from a variety of Ace Knotless netting in either 1/8th or 1/4 inch square. The material comes in white, so I dye it black (comes in other colours on request). The net bag is cut using a template and hot knife, then the edges over-locked using a polyester UV resistant thread."


Like I stated above, I am beyond impressed with Nick Taylor's work and appreciate him taking the time to create this very special landing net.
Interested in Nick creating something special for you too? Visit the Net Rod Trout website for more information.
No comments:
Post a Comment