
Matt Bennett made a decision earlier this year to pursue fly tying as a career and recently relaunched the Fly Geek website to include the beginnings of his fly offerings for purchase, blog, and signup for future newsletters.
With spring turning to summer I thought that it would be great to share the Brushy Creek Spider since everyone should have a few of these in their warmwater fly boxes.
Matt provided this well done step by step so tie up a handful and have a great time on the water.
BRUSHY CREEK SPIDER TYING RECIPE
HOOK - Gamakatsu B10S, Size 8-14
THREAD – Veevus 16/0 or equivalent, Olive
BODY – Larva Lace Evazote (Open Cell) Foam, Olive
WING – Deer Body Hair, Olive
LEGS – Fine (Small) Round Rubber Legs, Brown
DUBBING – Whitlock SLF, Nearnuff Sculpin Olive
This pattern is a variation off of a simple foam spider first popularized by Chris Johnson of Living Waters Fly Fishing in Round Rock, TX. I’ve tied these for the shop for several years, and added a few changes of my own to make it more durable and fishy.
This is a great spring sunfish pattern when the water is still a bit cool and the sunfish aren’t aggressive enough for poppers. Throw this guy near trees or twitch it in the current – just about any presentation works well. Olive works well for us on Brushy Creek, but the colors can be changed to match any local area terrestrials.

STEP 1 - Lay a solid thread base down on the hook, and return your thread to 2/3 back toward the eye of the hook.

STEP 2 - Cut a foam body – the width of the body should be close to the hook gap. I use River Road Creations Chernobyl Style Tapered End Cutters to make it easy. Tie this in at the 2/3 mark above. Be careful how much pressure you use – the foam can be cut fairly easily.

STEP 3 - Clean and stack a small clump of olive deer body hair. The length of the wing is personal preference but I like it to extend just to the edge of the foam body. I like to pre-cut my wing to size before tying it in.

STEP 4 - Tie in two rubber legs on either side of the wing. I like to keep these towards the top of the body so that they splay out nicely.

STEP 5 - Fold the front of the foam body back over the top of the hook, covering the tag ends of the wing and creating a foam bullet head of sorts. Secure this with several wraps, and add a small pinch of dubbing to fill in.
STEP 6 - Whip finish, and cut the tag end of the foam. Cut the legs to length – I prefer the back legs to be slightly longer than the front. Add a small drop of Zap-a-Gap or similar-viscosity super glue to the bottom of the fly for durability.

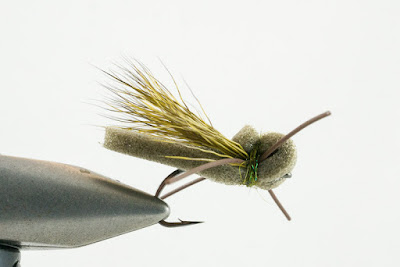
STEP 7 - Finished fly.
Check out the Fly Geek website and follow along on Facebook, Twitter, and Instagram.
With spring turning to summer I thought that it would be great to share the Brushy Creek Spider since everyone should have a few of these in their warmwater fly boxes.
Matt provided this well done step by step so tie up a handful and have a great time on the water.
BRUSHY CREEK SPIDER TYING RECIPE
HOOK - Gamakatsu B10S, Size 8-14
THREAD – Veevus 16/0 or equivalent, Olive
BODY – Larva Lace Evazote (Open Cell) Foam, Olive
WING – Deer Body Hair, Olive
LEGS – Fine (Small) Round Rubber Legs, Brown
DUBBING – Whitlock SLF, Nearnuff Sculpin Olive
This pattern is a variation off of a simple foam spider first popularized by Chris Johnson of Living Waters Fly Fishing in Round Rock, TX. I’ve tied these for the shop for several years, and added a few changes of my own to make it more durable and fishy.
This is a great spring sunfish pattern when the water is still a bit cool and the sunfish aren’t aggressive enough for poppers. Throw this guy near trees or twitch it in the current – just about any presentation works well. Olive works well for us on Brushy Creek, but the colors can be changed to match any local area terrestrials.

STEP 1 - Lay a solid thread base down on the hook, and return your thread to 2/3 back toward the eye of the hook.

STEP 2 - Cut a foam body – the width of the body should be close to the hook gap. I use River Road Creations Chernobyl Style Tapered End Cutters to make it easy. Tie this in at the 2/3 mark above. Be careful how much pressure you use – the foam can be cut fairly easily.

STEP 3 - Clean and stack a small clump of olive deer body hair. The length of the wing is personal preference but I like it to extend just to the edge of the foam body. I like to pre-cut my wing to size before tying it in.

STEP 4 - Tie in two rubber legs on either side of the wing. I like to keep these towards the top of the body so that they splay out nicely.

STEP 5 - Fold the front of the foam body back over the top of the hook, covering the tag ends of the wing and creating a foam bullet head of sorts. Secure this with several wraps, and add a small pinch of dubbing to fill in.

STEP 6 - Whip finish, and cut the tag end of the foam. Cut the legs to length – I prefer the back legs to be slightly longer than the front. Add a small drop of Zap-a-Gap or similar-viscosity super glue to the bottom of the fly for durability.

STEP 7 - Finished fly.
Check out the Fly Geek website and follow along on Facebook, Twitter, and Instagram.
No comments:
Post a Comment