
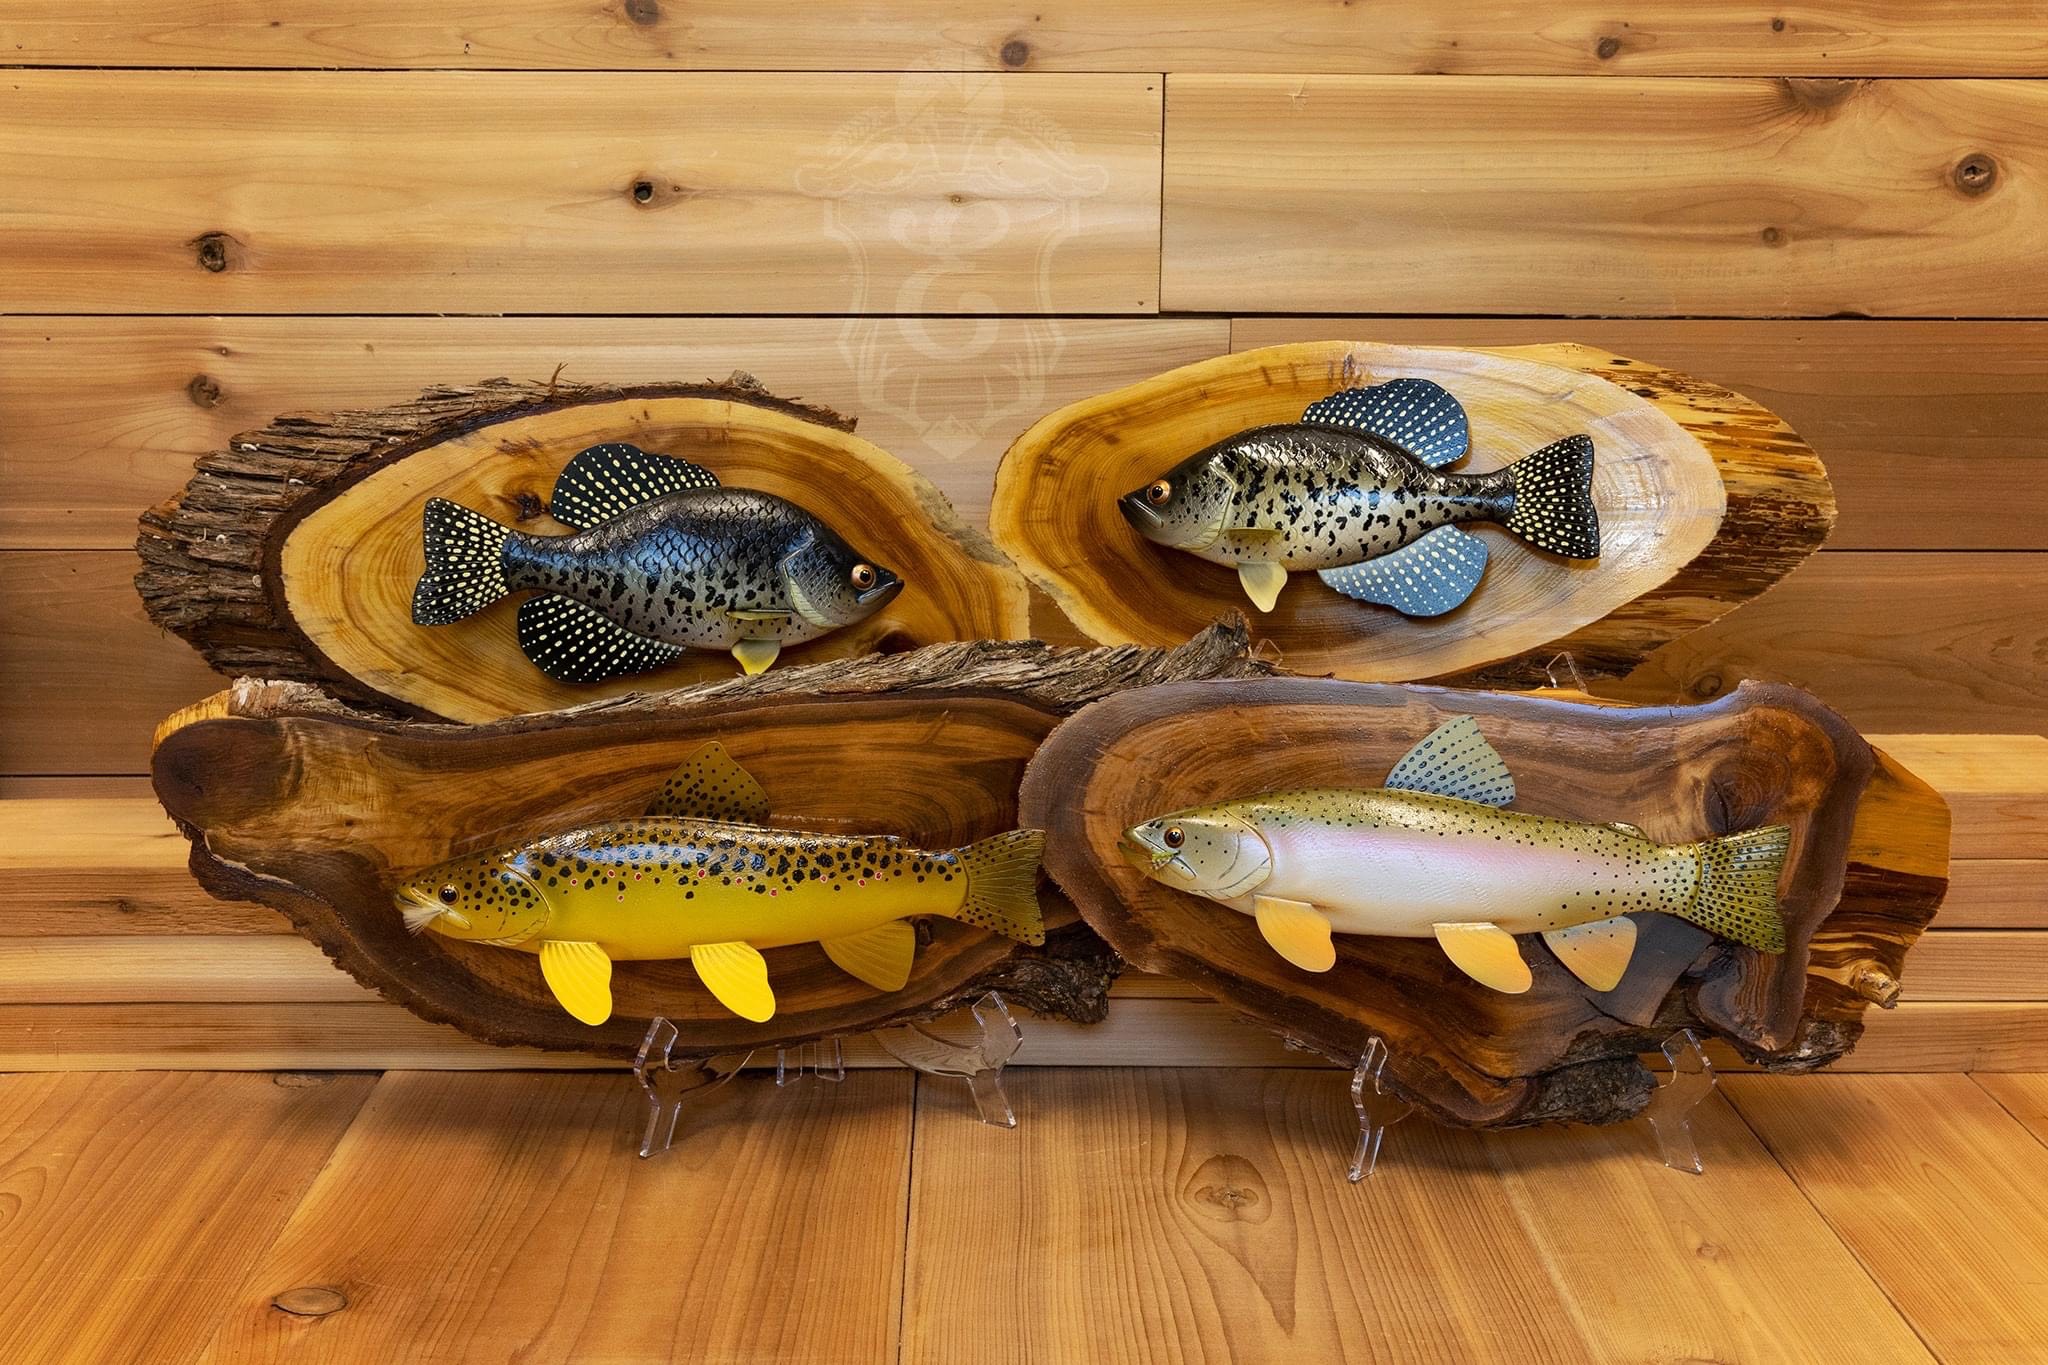
I know we are long past hard water season but Ryan Ebert sent along a great write up and images of his fish decoys that deserve to be shared now instead of waiting until next winter. I think his work is amazing and neat to see someone carry on traditions with such a level of skill.
One of my regrets about growing up in Michigan is that I never got into ice fishing. I think that I would really enjoy it and can appreciate the history, function, and folklore of time in a shanty or darkhouse.
Ryan wrote... "Fish decoys are commonly used throughout the nine states that have a darkhouse spearing seasons, in the northern half of the United States. Primarily for pike but also for the short lake sturgeon
seasons on Lake Winnebago here in Wisconsin and Black Lake in Michigan. They’re also highly
sought after by collectors and as home decor throughout the country.
The term “Darkhouse” is the name used by winter, spear fishermen to describe their
windowless ice shack. Spear fishermen require a dark environment so they can see into the
water. Briefly, darkhouse spearing involves selecting a suitable location on the ice, cutting a
large hole in the ice, and placing the shack over the hole. A wooden fish decoy, which has been
carefully weighted “swim” in the water through the open hole, is used to attract a fish. The
fisherman then uses a spear to harvest the fish, which swim in to investigate the decoy. Rules
vary from state to state in regards to hole size restrictions, and what species of fish you can
spear. Generally speaking, pike and rough fish are the target species in the states that have a
spearing season."
"I’ve been making decoys for a little over a decade now. Having been introduced to the sport
and functional art form by my friend and now retired DNR Warden, Mike Kitt. My very first outing
was just across the border in the Upper Michigan peninsula. We didn’t even see a pike that very
time but I was fascinated by this sport that is unlike anything else. While we didn't get a pike, we did get to watch trout and an otter swim through and I was instantly hooked. This traditional form of
angling is often described as being similar to bow hunting. You’re limited to one small area on
the body of water and often wait hours for just a few seconds of excitement when a northern
finally comes into view. I also like to compare it to duck hunting out of a chimney. It can be
incredibly challenging, and if you wanted a limit of pike for the dinner table in the winter, tip up
fishing would be a more effective option.
Most winters I make a couple trips to the U.P. and Minnesota for pike spearing. This winter on four outings, I took five pike and one whitefish for some meals, while merely watching 100+ pike just swim through or attack my decoys. This is referred to as “Look and Release”, much akin practicing to “Catch and Release”. I also go for a few days every February for the highly regulated lake sturgeon season on Lake Winnebago. In Wisconsin, we can only go pike spearing on Lake Superior waters, so for most going to our neighboring states is more convenient."
"I on average make about 30-40 fish decoys a year. Doing most of my carving in the winter
months. I’m most often asked how long it takes to make a decoy and there is no set answer.
Partly because there are many stages in the process where you have to wait a day or two for
curing and drying. You can’t just start one in the morning and having it finished by evening. It
also depends on how complex of decoy you wish to make. Is it something quite basic that’s
meant to be used or more decorative for a higher end display.
While there are many different methods to making a basic fish decoy I’ll break down my process
as briefly as possible.
I first start by cutting out the top and side profiles of the fish. Using exclusively cedar for wood
as it’ll hold up best to the extreme winter use. While other woods, like basswood or tupelo, carve
nicer, they will crack and fall apart if any water gets through sealants.
After cutting the profile I draw my center reference lines on all sides of the fish. As I start carving
these lines give me a reference point to round the fish too.
Once I have the basic shape roughed out I’ll then do my first round of sanding. After sanding I’ll
then draw on the additional details I wish to carve, like the gills, fin rays if it’s a wood tail, and
the mouth.
Then I’ll carve in those details and do another round of finer sanding. If I’m scaling the fish I’ll
use special tips and my Burnmaster wood burner to add in the scales. Varying in size and shape
depending upon the species.
Once everything is carved and sanded to my liking, I find the center of balance on the fish. On
the belly I’ll then draw a line from this center to about the back of the gills. This will be the lead
cavity. From which I’ll bore about a 1/3 of the way into the fish to create my cavity.
For the fins, I’ll draw my shapes out on aluminum to then cut out. You can use tin snips to cut it
by hand or I like to sandwich two aluminum sheets between thin sheets of wood and cut them
out on my scroll saw. I find this wastes less metal and gives me perfect pairs of fins.
You can then cut your fin slots into the body of the fish using a carving knife, exacto, or an
oscillating saw.
Now you may seal the body of the fish, to protect it against water and set your fins. I use a two
part epoxy to set and hold my fins in place. The lead in the body cavity will also help set your
pec fins.
After your sealant and epoxy has properly dried you can now weight your fish. I pour melted
lead into the body cavity, filling it about half way the first time. I then test it in a water tank to see
if it’s still buoyant, sinks like I want, or needs more lead added or taken out. This is the most
challenging part of the process and can take patience and many tries to get it dialed in. No
matter how similar you make a couple decoys, each one may require lead placed a little
different to get it to swim correctly in a nice forward motion. You also want your fish to sit level in
the water when it’s just suspended. For sturgeon spearers, they don’t care about the swim so
much and will just place enough lead into the fish until it sinks. Pike spearers are much more
particular about a decoy swimming properly.
I like to give my decoys two days of sitting and drying after weighting to ensure all water is gone
from the lead cavity. I’ll then fill up and shape the lead cavity with Apoxie Sculpt. Some guys use Bondo, wood filler, or smooth cast to fill the cavity.
Give your body filler plenty of time to cure. After curing then you may set your line tie, by finding
where it needs to be placed that the decoy sits level. I just use eyelets set with epoxy but there
are many options here. Once your decoy has fully dried again you may give it a couple coats of
primer.
Once your primer has fully dried then you can paint it however you’d like. There is no real wrong
way to paint a decoy, so long as those paints or inks hold up to water use once dried.
After painting give your decoy a nice clear coating. Some use two part epoxy like swim bait
makers. I prefer multiple light coats of spar urethane. It’s UV resistant, can flex with temperature
changes, and the coating is light enough to let the feel of the wood and carved in details show
through. Simple Rustoleum clear coat works too but I don’t think it holds up long term as well as
the previous two options mentioned.
Again this is just a real general breakdown of how a fish decoy is made. Certainly a lot more
finer steps to the process and each carver has their own particular methods. Use this as a
starting point but develop a method that works best for you and your style of fish decoy."


Want to see more of Ryan's work? Visit and follow his Instagram and shop his latest fish decoy creations through his Etsy page.
No comments:
Post a Comment